23 November 2013

From Nature

For the past month, as many of you now realize, I've been completely obsessed with dainty crochet snowflakes. I'm, however, also very picky about the patterns I chose to use in making said snowflakes. Well, the day has come when I have run out of patterns and diagrams that I absolutely love. What to do?

A few weeks ago, my husband (bless his heart) had suggested that I make my own pattern/diagram based on macro photos of snowflakes. They are absolutely gorgeous, and I am still convinced that he over estimates my creative capabilities.

Well, I tried it, anyway.

First, I found a photo I liked that looked simple enough. I didn't do a screenshot. Instead I took a photo of the laptop with my phone, because of the other steps I took in my creative process. I found the photo in this article.
Isn't it stunning? Check out that article. They are all so beautiful.
Did anyone else have one of those Fischer Price desks that had the back light in the tabletop? I LOVED that thing, and would just sit and trace for hours. My daughter now has one, and the desk is from whence I drew my inspiration. I turned up the brightness of my monitor, and set a piece of notebook paper over the screen.


After that, I just doodled over the traced image in order to try to decide what sort of stitches to use.
It . . . sort of worked . . . kind of . . .
I then decided to make what I doodled, doodled some more as I went, and wrote the pattern along the way.
Note to self: do not judge how easy or difficult creating a pattern based on nature by how simple the object appears. Recreating snowflakes from nature is the most difficult process I've ever encountered.

Do not; I repeat, do NOT follow this pattern. You will inevitably create what looks like a shrunken captain's wheel.
In my daughter's words, "arrr, my matey!"
BRKLAHKGT E;AWI F!!!! I was frustrated. So, I just set it aside, did my chores and errands, and went to sleep. I showed it to my husband today. Then, for whatever reason, as we were laughing at my failure, the correct way to make this just hit me. Of course, the crocheted version of this will most likely not look anything like the photo, just because it's physically impossible to recreate those gorgeously fragile crystalline walls with crochet thread. But, I think I came pretty close this time.

Here is a photo of what I have soaking in starch at the moment:
Much better, am I right?
Photos of the blocked version will be coming soon. I have also written the pattern, and it will be available within the next week, hopefully along with a diagram (ooooh, aaaah), and that diagram decoding chart I mentioned in my previous post. Until then, be inspired by nature, but be humble enough to know that God's works are infinitely better than man's.

As always, happy stitching! xo

16 November 2013

Diagrams

I've known how to crochet for 17 years. My Nana, whom I love very dearly, taught me how to make basic stitches. I never really did anything with it until nearly ten years after she taught me those stitches, though, and even then, I was very stubborn. I did not want to learn how to read a pattern. It was not until I moved out on my own that I learned how to do so, as I no longer had her wisdom at my disposal. I quickly latched on to the jargon and abbreviations commonly used by pattern authors.

A few years after figuring this out, I saw something very adorable that I wanted to make. The problem? There wasn't a pattern. Only a diagram. This was about 3-4 years ago, and I, in all my stubborn glory, was too lazy to learn how to read the diagram. It seemed too confusing.

I mean, look at this nonsense.
For the past month, however, I have had a ridiculous obsession with crocheting snowflakes. I do believe that literally everyone on my gift list will be receiving one this year, just because I really, really do not want to make anything else. Luckily, there are a plethora of snowflake patterns on t3h interwebs. However, I ran across the same problem I did a few years prior.

The cutest of snowflakes were (of course) written in Japanese originally, but had diagrams included in the free patterns. (Have I ever mentioned that "free" is my favorite four-letter word?) It didn't help that the website where I found these diagrams via Pinterest is written in Russian. I don't speak either of those languages! WHY couldn't it be in some other language that I could figure out? Remarkably, most German is so similar to English that I can figure it out. Italian and French are likewise close enough to Spanish that, using the bit I know of the idiom, I can figure them out, as well. But, no. It has to be in Russian.

Looking back, I'm really appalled at my failure to think of using Google Translate. Sigh.
So, I set about remembering how to read the diagrams. Just as when I finally learned to read patterns, I found that not only was reading diagrams surprisingly easy, but there are SO MANY benefits from doing so, and therefore so many reasons I love reading them now. Here's a list of why:

  • You can see where you are in the pattern much easier than in a written pattern.
    • Only 2 of these are from a written pattern.
      Can you guess which ones?
    • Instead of reading through lines of text to remember where you are (since you can't keep your finger on the page while crocheting), you just have to remember where in the picture you are. For many, like me, this is much easier.
  • You have a clearer vision of the big idea.
    • I like to change patterns slightly to suit my style and the taste of the recipient. By seeing where I'd like to change the pattern in a diagram and how the author accomplished what they did, I can make better decisions about the best way to go about my changes.
  • Diagrams break language barriers into tiny little bits of dust.
    • Seriously. I. Cannot. Read. Russian.
  • They often make prettier patterns. 
    • This obviously is not always true, hence my use of the word "often." However, I seem to like the products from the diagrams better.
By the way, I do plan on making a nifty little chart in the near future for reading diagrams.

Written pattern or diagram: which do you prefer, and why?

Happy Stitching! xo

12 November 2013

Dina the Dino!

Christmas prep is in full-swing here in our home! I'm working on finishing up an advent calendar for my daughter, and working on crocheting all sorts of ornaments and gifts.

My latest endeavor is for a little girl whom I love just as much as my own. She is my daughter's best friend, and they have literally known each other since she was taking her first steps, and my daughter was in my womb. They love each other unconditionally, just as sisters or cousins. This little friend of ours loves all things pink and dinosaurs. I happen to have had a dinosaur pattern sitting in my Ravelry queue for years. I decided to make it for her, because I realized I had never made anything for her before. My daughter, of course, was super jealous, claiming that I "never make anything for [her]," despite the fact at least half of my projects are dedicated to her, including the "owlghan" I recently completed. She's very dramatic and distraught that she will not be receiving anything from me for the next month and a half until Christmas is here. Life is so hard at the ripe old age of four.

This pattern was super easy. It's called "Dudley the Dinosaur" and was written by Maureen Hartog. It is offered as a free Ravelry download, and can be found here, if you have an account. If you don't have an account, what's wrong with you? Please go make one. There are so many fabulous patterns for free and for purchase on this site.

I made Dina with Hobby Lobby's "I Love This Yarn!" in Pink, and some Red Heart white & silver Christmas yarn. Both are worsted weight yarns. I used a size G/6-4.25mm hook.

A few discrepancies I had with making the pattern were with the neck and the legs. I didn't want to sew up the side of the neck, and so I just crocheted in rounds. I also didn't like having the legs be different lengths, and so all four of them have ten rounds, instead of two of them having ten rounds, and the other two having twelve. Speaking of, the pattern is worked in rounds, not rows. The pattern is still very straight-forward, and easy enough to follow, especially for beginners. I'm beginning to notice that, as in writing literature, every pattern author has a voice of their own, and their own way of explaining things. If you do decided to make a Dudley the Dinosaur (or Dina), please take a few moments to read over the pattern first. Ms. Hartog's increases and decreases are described in a way I have not encountered before. It was not difficult to catch on to her language at all. It just caught me off guard, because I did not read the pattern before making it. D'oh!

Another thing I did differently than Ms. Hartog, is that I used buttons for eyes on Dina instead of googly eyes, since the buttons can stand up to more play. To accomplish this, I sewed on the button eyes before I began any decreases in the head; round 14, to be exact. Should you choose to follow in my stead, you definitely want to sew them on before you add any sort of stuffing, as the filler could be difficult to maneuver a needle around.

Just for kicks and giggles, I made her a little bow that can be removed. It's just a few rows of 3 sc attached to a chain of 28.

Overall, I give the pattern a 14/16, according to my rubric for reviewing patterns. I haven't found any other sources for the pattern besides Ravelry, which admittedly is an excellent source, still doesn't provide much accessibility for the pattern. There were no other discrepancies with the pattern besides those mentioned above and the accessibility of the pattern.

Here's a photo of Dina the Dino! Happy Stitching! xo


08 November 2013

Of Snowflakes & Starch

I honestly cannot believe how long I've been offline. I do sincerely apologize for that! I would blame it on the sinus infection I had at the same time my daughter had pneumonia, and my husband was at the beginning stages of a sinus infection, buuuut . . . that only lasted one week, and the rest of the time, well, I've just been lazy.

My latest endeavor is to make a bunch of pretty ornaments to post in the Etsy shop. Crochet snowflakes are some of the prettiest ornaments; perhaps even some of my favorites ever. You know, "girls in white dresses with blue satin sashes, snowflakes that stay on my nose and eyelashes," for you Julie Andrews fans out there. So far, I've made some granny stars, and a few pretty little snowflakes. I'm also making a couple pairs of tiny snowflake earrings. I'm stoked!

One of my bigger pet peeves in the crochet world is the amount of folks who just don't know about starch. It seems that every photo of a doily depicts one that is extra floppy. I'm not saying they should be super duper stiff, but it seems more evident in my snowflake ornament research that more folks know to starch the ornaments than others. It just makes sense that if an ornament has to be starched, then so does a doily. They're both made of crochet thread. They're both used in decorations around the home and need to stand up to some use. If you want them to stay pretty, they should have some help keeping their shape, right?

So, my ornaments/earrings (just like my doilies after I've made them) have been hanging out in a cup full of starch all day. This is what I had to do to keep my lovely family out of the little cup they were in:


After hanging out there, they were stretched out ("blocked") on a piece of cork "bulletin" board with push pins. (It's so evident these were taken at different times of the day, because both were taken in the same area. Eep.) Here's a photo of the ornaments:


Aren't they pretty? I'm so excited about these little darlings! I'm even more excited to getting around to making even more! They make perfect gifts for those folks y'all just don't know how to shop, or even make for.

For a lovely little size comparison, here's a photo of one of the doilies I made for the centerpieces at my wedding back in June:


The ornaments ALL fit on one little 12x12 board. For the doily, I had to kind of tape the four together and fit it in the middle.

The solution that I used for both the ornaments and the wedding doilies is about 1:1. I wanted the wedding centerpieces to be stiffer than your average doily, since I made them months in advance, thus needing them to be able to stand up to the move and storage. Some of them even went to homes in California and Maine, so they needed to additionally stand up to the travel post-wedding. For a normal doily, I would use a solution of 2:1, water:starch.

Look for more photos of "my favorite things" that will be added to the shop soon!

Happy Stitching! xo

10 October 2013

Owlghan: edging

I've finished the crochet portion of my daughter's owlghan! I'm so excited to not have to stitch any more on it haha. Here's a photo of the semi-finished owlghan:

My daughter seems to be very happy with it. At first, I had too many sc in the first two rounds of the edging and it was too wavy. So, to solve that problem, I did a decrease stitch (sctog) over the joined corners of the squares, treating the two spaces as one. This allowed me to have more control over how much wave/ruffle there was to the edging.

Honestly, I still wish it would lay flat. I think I did something weird with my V-stitches, but I'm not willing to take it out and re-do it again. Here's what a close-up of the edging looks like:


I did a round of sc in purple, a round of sc in grey, a round of V-stitch in grey, a round of V-stitch in pink, another round of V-stitch in ivory, and then a mini shell with ivory.

In the corners on the sc rows I did [sc, ch 3, sc].
I didn't fasten off the different colors. I joined by knotting the two yarns.
The V-stitch is done like so: ch 3, dc in corner sp, ch 3, dc in same sp, dc in next st, skip next st, dc in next st, ch 1, dc in same st. And continue around.
The mini shell corners go as such: hdc, ch 1, dc, ch 1, hdc in corner st.
In each of the V-spaces, I just did [hdc, dc, hdc]. 

I just need to finish weaving in all the ends. I don't even want to think about it right now. After I do that, I'm going to line the blanket either with some cotton or satin fabric. I haven't decided, yet. What would you use?

Happy stitching! xo

09 October 2013

Owlghan: joining comments & granny pattern

Hey, awesome you!

This post is two-fold. There is a review of the joining technique used, as well as the pattern for the filler grannies that I created.

I have never in my life made an afghan in which joining was required, but when I saw these cute little guys wandering around on Pinterest, I just thought they were so adorable, that an afghan HAD to be made with them!!


The pattern for these adorkable little darlings can be found on a blog called "Repeat Crafter Me." Please click on the image above to go directly to the pattern!

There was no getting around it. I was enchanted. An owlghan. How cute, am I right? Now that I'm closer to being done with the afghan . . . well, I'm just honestly not sure that I'll ever make another afghan in which joining is required again! Don't get me wrong, it's certainly not the joining that was a pain in the neck. Honestly, it's getting the edging right, but I'll focus on that in another post later this week.

So, the first thing I did was pick out the colors I wanted to use. This afghan is for my 4-year-old daughter, so pink and purple just had to be in the mix. I'm in love with everything sage right now, so I threw some of that in there to add some contrast. The colors together remind me of a fairy tale.

Confession time! I did not make a graph for how many squares I would make before I started making them. Don't judge me! I had a valid reason for not doing that. There's a madness to my methods.

I wanted to see how quickly and easily I could put the owls together. I'm a fast crocheter, and I'm not all that patient. So, sewing on buttons and making beaks and feet on top of the normal crocheting? Eh. Making a ton of owls did not seem like my thing. I don't mind the little nuances of adding and decreasing stitches, sewing parts together, and sewing embellishments on so much when I'm making a stuffed animal, because they're normally pretty easy and quick to make, but a ton of monotonous little owls? What was I getting myself into?

Luckily, the pattern for the owls really is fairly quick and easy. Naturally, as well, I cheated a little bit and used a larger hook size than the pattern calls for. I still didn't want to make that many owls, though, so I made up a filler square to go in between them based on the center of the owls for continuity. The pattern is so incredibly simple. It goes like this:


OWLGHAN FILLER GRANNY
Make a magic circle.
ch 1
Rnd 1: 8 hdc in magic circle, pull string taught, sl st to join (8 st)
Rnd 2: ch 1 (do NOT turn), 2 hdc in ea. st around, sl st to join, finish off 1st color (16 st)
Rnd 3: with 2nd color, sl st to join, *ch 3, sk next st, sc in following st, repeat from * 6 more times, ch 3, sl st in same st as join (8 ch 3 spaces)
Rnd 4: ch 3 (counts as first dc now and throughout), 2 dc in same sp, ch 2, 3 dc in same sp, *ch 1, 3 dc in next sp, ch 1, 3 dc in next sp, ch 1, 3 dc in same sp, repeat from * 2 more times, ch 1, 3 dc in next sp, ch 1, sl st to join, fasten off 2nd color (4 corners, 4 sides, 36 st)
Rnd 5: with 3rd color, sl st in corner to join, ch 3, 2 dc in same sp, ch 2, 3 dc in same sp, *ch 1, 3 dc in next sp, ch 1, 3 dc in next sp, ch 1, 3 dc in next sp, ch 1, 3 dc in next sp, ch 2, 3 dc in same sp, repeat from * 2 more times, ch 1, 3 dc in next sp, ch 1, 3 dc in next sp, sl st to join, fasten off (48 st)
Rnd 6: with 4th color, sl st in corner to join, ch 3, 2 dc in same sp, ch 2, 3 dc in same sp, *ch 1, 3 dc in next sp, ch 1, 3 dc in next sp, ch 1, 3 dc in next sp, ch 1, 3 dc in next sp, ch 1, 3 dc in next sp, ch 2, 3 dc in same sp, repeat from * 2 more times, ch 1, 3 dc in next sp, ch 1, 3 dc in next sp, ch 1, 3 dc in next sp, sl st to join, fasten off.

After I got going on the squares, I jotted down a graph on the back of a random piece of paper I had lying around the house. When I got all of the squares done, I slip stitched in each stitch along all the columns first to join, and then along each of the rows. I like the slip stitches being on the front so they're more visible. Owls are very good hiders, and they like to hang out in trees. These should reflect that somehow. To me, it looks like they're perched on the white joining, or even peeking out of a hole in a tree. This is what it looks like pre-border:


As always, I hope that you find this post helpful! If you have any questions or concerns, please comment below. Happy stitching! xo

07 October 2013

Blog Feature no. 2!

Blue Cloud Crochet has yet again been part of a feature on the Middle Tennessee Crafts blog!
Check it out here!


01 October 2013

Ends . . .

When it comes to weaving in ends, I'm terrible at it. Honestly. What I normally do is just work over the ends, and hope that my work doesn't get undone. The last afghan I made before beginning my daughter's owlghan, though, has been mutilated more than once by our miniature pincer, Tony. (Yes, Tony. Tony DiNozzo.) In order to prevent that from happening with the owlghan (because, let's face it, there are TONS of ends in that thing that could potentially come undone), my Nana offered some of her sage advice. Here it is below:

Owlghan!
 "Weaving" in Ends

1. Find an end
Just like this one ^
 2. If necessary, pull some of the end back out if you've worked over it and it's just too short otherwise.
Pulled back through 3 stitches so this end is in the middle of a corner.
 3. Split the yarn. Literally, grab a half between two fingers in one hand, and another half in two fingers of the other, and pull till it comes apart a bit. You should now have 2 ends like this:
I promise, this has no bearing on what my hair looks like right now.
 4. Pull one of the ends back under a loop on one of the previous stitches like so:
I had pulled both back through one before I pulled one through another.
 5. Double-knot (square knot) the ends just like you would a pair of shoelaces.
Knotty yarn.
6. Pull the yarn back under the other stitches. Tuck in more, if needed.

So, that's mine and Nana's way of taking care of our ends so they don't fray and work doesn't come undone. Hope this little tidbit was helpful!

Happy Stitching! xo

24 September 2013

GIVEAWAY!

This week, I'm having a giveaway over on my Facebook page. I'm giving away a FREE Bow Bracelet (s&h included)!


To enter all you have to do is:

1. Like the Facebook page.
2. Like the Bow Bracelet link.
3. Share the link.
4. Comment on the link.

Each participant will receive a 50% off coupon code at the end of the week to share with their friends and family. The winner will be announced on MONDAY 30 Sept. 2013.

Bueno suerte & happy stitching! xo

23 September 2013

Magic Circle Tutorial

After posting the original pattern for the Neko Ear Warmers, a friend of mine suggested that I post a tutorial showing how I make my magic circles. (Julie, this is for you, dear.) Although I'm fairly certain I actually cheat when I make them, this is the easiest and fastest way I have figured out how to make the ever-useful magic circle. Plus, it holds up well in the work.

Before we begin, here's another disclaimer: don't judge me for how I hold my yarn. I know it's not technically correct. For whatever reason, though, my pianist fingers are strong enough to hold the yarn taut without wrapping it around my pinky. I just don't think about it. It works for me. Do what works for you.

Anyway, here's your snazzy little photo tutorial:

First, hold your yarn like you're about to cast on.


Keep acting like you're about to cast on by inserting the hook on the left side, and making a loop with the yarn. Hold that X the yarn makes between your middle finger and thumb:


Next, insert your hook into the loop from the front side:


Draw up a loop:


Then, follow the pattern and make the stitches over the 2 strands to the left of your hook. For this example, I'm making one of the ears that belongs on the Neko Ear Warmer.

NOTE: there will be one short end. Make sure that, no matter how many stitches you make, you can always grab the short end! That short end is essential. It's what puts the "magic" in "magic circle." No lie.


Once you've finished your stitches, pull that short end before you sl st to join or continue on to the next round (if working in continual rounds).


Make that hole in the middle of all the stitches as small as your little heart desires, and boom! You're done.


Magic circles are ideal for making hats, and, well, anything that's round except maybe a doily. I wouldn't use a magic circle for a doily. Let's not be silly, now.

By the way, in case you can't tell, YES that is a smaller version of the Neko Ear Warmer. The updated pattern is available for purchase in my Etsy shop.

I hope this tutorial is helpful to you! If you have any questions, concerns, or find an error in the tutorial, PLEASE contact me via e-mail, Facebook message, Etsy message, a comment on here . . . basically, whatever. Just let me know, so that others who use this tutorial won't have any problems.

Happy stitching! xo

18 September 2013

Pattern Review Rubric

The holiday season is quickly approaching! In order to save money, I typically crochet at least 75% of the presents I give to others. Because of this, over the next few months, you'll be seeing a lot of pattern reviews. The last one I did was not as organized, though, as I'd like the rest of them to be.

How many of you are experienced with education? My degree is in music education. Because of the nature of music, most of the assessments music teachers give are not written. Therefore, we normally include a performance rubric with our lesson plans to give to principals or other supervisors to show how we are assessing the students. In order to make future pattern reviews more clear and organized, I have created a rubric that the patterns must meet to attain a precise score out of 20. I've included it below:


I have multiple patterns to review that will be popping up on the blog over the course of the next few weeks. If you have any patterns you'd like me to review, though, please send them my way!

Happy stitching! xo

17 September 2013

What have YOU made?

In the past month, I've made 2.75 projects for myself & my family. They are a sweater for my daughter, an afghan meant for the entire family, but used mostly by my dog, and another sweater for myself that I haven't finished the sleeve edging on. I need to do that.

It should be known that I honestly do not usually buy my patterns. I adore the ones available for free. However, I have a subscription to Crochet Today and it's fantastic. Also, that crocodile stitch sweater is super cute, and totally worth the money.

Do you sometimes start a project and then set it aside to go chase that figurative squirrel?

What have you made recently?

I want to hear from the awesome YOU!

Happy stitching! xo

12 September 2013

Neko Ear Warmer Reprise

Hey, awesome you!

A week or so ago, I introduced a pattern called, "Neko Ear Warmer."

I would like to announce that the pattern is also available to purchase in the shop!

Remember that right now, 10% of all proceeds benefit the American Heart Association.

Happy stitching! xo

11 September 2013

Bow Bracelet Pattern!

Hello, awesome you! Here is that new pattern I promised to you earlier this week.

 I wear bow ties now. Bow ties are cool.

The pattern is available to purchase here. Remember that 10% of all proceeds benefit the American Heart Association this month!

If you make this pattern, pretty please take pictures and send them to me! You could be featured in the blog!

Happy stitching! xo

06 September 2013

Awareness Bracelet

Blue Cloud Crochet is proud to present to you a new pattern! This one is for purchase, instead of for free. Why? Because, as I mentioned in the previous post, a dear friend of mine has passed away. She suffered from a stroke. Other relatives have passed on in the same manner. My grandmother also has suffered from a stroke, and congestive heart failure. So has another dear teacher that taught both myself and my husband. The list of folks I care for who have suffered from heart complications goes on.

Even I have a heart murmur. (Yeah, it's kind of like Laman and Lemuel. Bad Mormon humor. I'm not sorry.) The murmur is minor, but my doctor still keeps a close eye on it because of my family history of heart disease.

The thing is, though, heart disease and stroke are definitely not just problems that affect my family. They run rampant everywhere. Be aware of your body. Go to the doctor for regular check-ups.

The pattern I've created is an awareness bracelet, in memory of my dear friend that recently passed (her name was L.A.). It's also in honor of my Nana, our relatives, our family, as well as our friends who have struggled with heart disease and stroke.

With every purchase of either a bracelet or the pattern for it, 10% will be donated to the American Heart & Stroke Association.

Here are some photos of the finished product:


You can purchase the pattern here, or the item itself here. Again 10% of all proceeds will be donated to the American Heart & Stroke Association. Thank you for your support!

Happy Stitching! xo

04 September 2013

Fire & Rain

Have you ever had a dear friend pass away?

I haven't. That is, until yesterday. Sure, I've known others who have passed away before, but we weren't necessarily close. I wasn't even, honestly, super close to this lady. She just helped save mine and my daughter's lives, is all. She also photographed mine and my husband's wedding just this past June.

Have you ever sympathized or empathized with someone that you physically hurt from the sadness?

My heart aches for her husband.

She died of complications following a stroke from which it seemed she was healing. I want each and every one of awesome you to be aware that strokes often happen without notice, and can steal your life away in an instant. Sure, LA is in a better place, and is without pain now. But you are here. You are living. You are awesome and you have so much to live for.

Think of the ones you love. Think of how much they love you. Be grateful, awesome you.

Be on the lookout for a new product coming to the shop in honor of my friends and family that have suffered from strokes and heart disease. 10% of all the proceeds from this item will be donated to the American Heart & Stroke Association.

Happy stitching, my loves. xo

29 August 2013

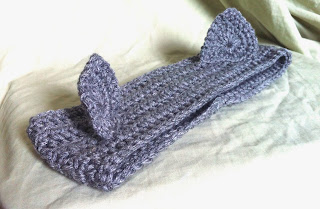
Neko Ear Warmers

My mind, recently, has been on Japan and its culture, as well as on Halloween. My daughter has discovered Sailor Moon, and I have been very happily re-watching all of the episodes with her. The series brings back so many childhood memories for me. My best friend from elementary school is half Japanese. I vividly recall watching episodes of the anime not yet released in the U.S. with her in Japanese, and pretending to be sailor scouts ourselves. She is now in Japan, teaching English to youngsters. I couldn't be happier for her!

In Japan, cats are very beloved. Sailor Moon itself has two cats in it: Luna and Artemis. With Halloween just a bit over two months away, I've had cute crochet hats and ear warmers on the brain. I've already made a pumpkin hat that I'm very proud of. You can see more photos and purchase a custom made beret here. I used an already existing pattern for the hat itself. However, every other little bit it (the stem, leaf, and vine) I stitched together on the fly. Making up those few bits really got my creative juices flowing. The leaf I made for the hat really almost looks like a cat ear, right?


This got me to thinking: why not write my own pattern for a cat-eared ear warmer? I wish I had not attached my ears so far apart, but the pattern is very quick and easy. Enough of me blabbing, though. I got to work and wrote the pattern for the cat-ear ear warmer ("Neko Ear Warmer"). I'm even posting it for free below, just because I want to see how many people actually make it. (If you do, you must send me photos! Please?) If you don't want to go through the trouble, or don't know how to crochet, you can always purchase a custom-made one from my Etsy shop. If you do make the pattern, though, please don't sell it, since it's copyright BlueCloudCrochet. The published pattern is just for fun! Happy stitching! xo


Neko Ear Warmer
Yarn weight: medium worsted (4) (10 ply)
Suggested hook: H (8-5.00 mm)
Notions: tapestry needle
Size: adult
Gauge: 6 hdc = 2 in. 5 rows = 2 in.
Abbreviations:
                Ch = chain
                Sc = single crochet
                Hdc = half double crochet
                Dc = double crochet
                Tr = triple crochet
                Sl st = slip stitch

BAND
Ch. 70
Row 1: hdc in 3rd ch from hook & each ch across
Row 2: ch 2 (counts as 1st hdc) hdc across (69 st.)
Row 3 – 7: repeat row 2
Row 8: ch 1, sc in ea. hdc across. Finish off. (69 st.)
Sl st in foundation ch. Ch 1. Sc across. Finish off, leaving a long tail for sewing. (69 st.)
Fold piece in half, & sew together using tapestry needle.

EARS (make 2)
Make a magic circle, ch 1.
Round 1: in magic circle, 2 sc, 2 hdc, 2 dc, 3 tr, 2 dc, 2 hdc, 2 sc, sl st to join. Pull string from magic circle to tighten to desired tautness.
Rnd 2: ch 1. Do not turn. Sc in same st as join. Sc in next st. 2 sc in next 2 st, sc in next 3 st, 3 sc in next st, sc in next 3 st, 2 sc in next 3 st, sl st to join.
Rnd 3: sl st in next 2 sc, ch 1. Sc in same st, ch 1. [sc, ch 1] 8 times. [sc, ch 1, sc] in next st. ch 1. [sc, ch 1] 7  times. Sc in next st. sl st in next st. finish off, leaving a long tail for sewing.
Attach each ear to desired locations on band.

03 July 2013

Model . . . I needs one.

 
Items include, but are not limited to: size 8-10 vintage blue/green handmade dress, earrings, and bracelets. Pay will be discussed with interested parties.

29 April 2013

Pattern Review

While mulling around on what to do for my next project, I came across this.

Image of Sandy Shore Washcloth Set


Don't they just look warm, luxurious, and lovely? Well, I thought so, anyway. What I thought was neat was that there wasn't just one pattern there, but four. And they're all free! Awesome.

I just needed some cotton yarn. I suppose that you could make them with acrylic, but the thing about acrylic is that it does not absorb any water, so what's the point? I don't do stitch samplers. I needed some yarn to finish an afghan, anyway, so I went to the craft store. I ended up picking up some Lily Sugar 'n Cream. Well worth it, despite the price per ounce.

                                              Country Stripes 10202121143       Violet Stripes 10202121317
    

Such pretty colors, don't you think? I couldn't resist. Those are the colors I bought.

I set to work on the first pattern; the Grit Stitch Washcloth. So fun!


I love how the stitch looks so complex, but it's actually very basic. A beginning crocheter could make this.


I added an edging to it, just to make it look more finished. All I did was work a bunch of single crochets all around. On the corners I did (sc, ch 1, sc). I think it worked out quite well. Here's the finished product:


Overall? Very easy pattern, very pretty product, and a very happy Sammich. I plan on making some of these for Mother's Day to sell in the shop, as well as to give to my Nana and future mother-in-law.

Before you ask, I DID try some of the other patterns. Or, rather, I started to. The thing is that I don't particularly like just making a ton of double crochets in a row, or really a lot of any of the same stitch in a row. I like diversity, even if it's a motif that's repeated. That's why the only one I actually made was the Grit Stitch Washcloth. But, if you like that sort of thing, or how the other patterns look, by all means, go for it. They are all incredibly simple.

Enjoy!